
To increase the disc size from the command line, login to the Proxmox host. In the command line you can list the VMs configured by this command to find the VMID needed. For this example the VM with the VMID 104 will be used to increase the disc size.
[Host]$ qm list
 VMID NAME                 STATUS     MEM(MB)    BOOTDISK(GB) PID
  101 Test-VM-web          running    1024               3.00 27171
  102 Test-VM-mail         running    1024               3.00 27198
  103 Test-VM-rpm          running    1024               3.00 554879
  104 Test-VM-disc         running    1024               6.00 5285
![]() At this point I suggest that you consider creating a backup of your VM in case something goes wrong. Proxmox provides great tools for this right out of the box. The following Command will create a compressed archive of the VM with all its configuration and data.
At this point I suggest that you consider creating a backup of your VM in case something goes wrong. Proxmox provides great tools for this right out of the box. The following Command will create a compressed archive of the VM with all its configuration and data.
[Host]$ vzdump 104
Proxmox uses qemu for the KVM virtualisation which provides a variety of information about the VM. The following command will show more details about the VM, including the disc type and size.
[Host]$ qm config 104
bootdisk: virtio0
cores: 1
ide2: none,media=cdrom
memory: 1024
name: Test-VM-disc
net0: virtio=2E:09:DD:A1:C9:DC
net1: virtio=4A:D1:02:62:C0:15,bridge=vmbr1
numa: 0
ostype: l26
smbios1: uuid=9b63407e-5df0-49b7-a6b5-4c49eb31fc9b
sockets: 1
virtio0: local:104/vm-104-disk-1.qcow2,format=qcow2,size=6G
The important information from this command is the identification of the disc-type which is in this example “virtio0” representing the first disc connected via the virtIO bus. To check the Disc image details you can execute the following command.
[Host]$ qemu-img info vm-104-disk-1.qcow2
image: vm-104-disk-1.qcow2
file format: qcow2
virtual size: 6.0G (6442450944 bytes)
disk size: 827M
cluster_size: 65536
Snapshot list:
ID        TAG                 VM SIZE                DATE       VM CLOCK
1         Test_Snapshot             0 2015-07-11 22:20:35   00:00:00.000
Format specific information:
    compat: 1.1
    lazy refcounts: false
    corrupt: false
With the VMID and the disc-bus information (virtio0) inside the VM, the disc can be resized.
Resizing a disc image has a couple of limitations. One of those is that it is not possible to decrease the disc size. Another limitation is the snapshot feature. A disc image with a snapshot is not resizeable. The output above shows an example of an image with snapshot. You will notice a error message like this in the console.
VM 104 qmp command 'block_resize' failed - this feature or command is not currently supported
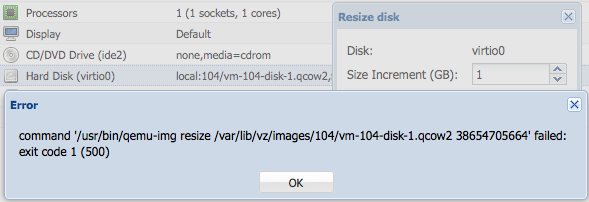
At the time of writing, the Proxmox web interface is sadly not reporting this situation back to the user with all the details. The Proxmox web interface will simply show a message like this giving no clue about the actual reason.
To actually resize the disc image from the console, qemu provides this easy command.
[Host]$ qm resize 104 virtio0 +14G
Image resized.
The disc image connected to virtio0 is now increased in size by 14 GB. As qcow2 disc images are only as big as the data stored inside the disc image, the filesize will be not effected by the resize operation. Increasing the disc image allows the disc now to grow to the new size of 20GB instead of the old size of 6GB.
The disc image information reflects this change in the “virtual size” while the “disc size” is unchanged and shows the actual amount of space used by the disc image.
[Host]$ qemu-img info vm-104-disk-1.qcow2
image: vm-104-disk-1.qcow2
file format: qcow2
virtual size: 20G (21474836480 bytes)
disk size: 827M
cluster_size: 65536
Format specific information:
    compat: 1.1
    lazy refcounts: false
    corrupt: false
Connecting the disc image to the host system
To change the size of the partitions inside the qcow2 disc image, the disc needs to be availabe to access it exclusively. This is not possible while the VM is booted off that disc /disc-image. If the resized disc is not the boot disc, you might be able to unmount the disc from the running VM and follow the instructions to resize the partitions.
If the resized disc is the boot disc of the VM, it is common to use a Live OS boot medium containing all required tools to boot the VM in a state where the disc is not used.
With access to the Proxmox host and its commandline, this step is not needed. The disc image can be made available to the Proxmox host to perform the required steps. That is possible via qemu-nbd (nbd stands for Network Block Device) and allows to connect the qcow2 disc image (representing a virtual block device) as a device to the system.
The required kernel modules to do this are already installed with the Proxmox environment but not loaded into the kernel. Thanks to the flexibility of the linux kernel, such modules can be loaded at runtime.
[Host]$ modprobe -av nbd
insmod /lib/modules/2.6.32-37-pve/kernel/drivers/block/nbd.ko max_part=15
This will load the qemu-nbd kernel module. With it loaded qemu can connect the disc image of the VM to the system.
Before connecting the disc image to the system, make sure the VM is stopped.
[Host]$ qemu-nbd -c /dev/nbd0 /var/lib/vz/images/104/vm-104-disk-1.qcow2
There will be no output from this command on success. The result of it will be a device connected to the disc image resized earlier. The device is available as /dev/nbd0 and can be accessed as a block device.
[Host]$ apt-get install nbd-client
The above package need to be installed on the Proxmox host to allow the different tools to interact with the connected disc image properly.
Resize the partitions of the disc
To resize the disc, the partitioning tool parted is used to change the size of the root partition on the disc. The following output shows the partition table where the free space is shown. The partition with the number 2 is an LVM containing the logical volume of the root filesystem. This is the partition that will be resized.
[Host]$ parted /dev/nbd0
(parted) print free
Model: Unknown (unknown)
Disk /dev/nbd0: 21.5GB
Sector size (logical/physical): 512B/512B
Partition Table: msdos
Disk Flags:

Number  Start   End     Size    Type     File system  Flags
        32.3kB  1049kB  1016kB           Free Space
 1      1049kB  525MB   524MB   primary  ext4         boot
 2      525MB   6442MB  5917MB  primary               lvm
        6442MB  21.5GB  15.0GB           Free Space

(parted) resizepart 2 21.5G
(parted) print free
Model: Unknown (unknown)
Disk /dev/nbd0: 21.5GB
Sector size (logical/physical): 512B/512B
Partition Table: msdos
Disk Flags:

Number  Start   End     Size    Type     File system  Flags
        32.3kB  1049kB  1016kB           Free Space
 1      1049kB  525MB   524MB   primary  ext4         boot
 2      525MB   21.5GB  20.9GB  primary               lvm

(parted) quit
Information: You may need to update /etc/fstab.
With the command “resizepart 2 21.5GB”, parted is instructed to increase the size of the partition number 2 by defining the new end of the partition at 21.5GB which is the reported end of the free space shown in the first output.
After this step, the disc is increased and the partition size is changed as well. This is it for the tasks to be performed on the Proxmox host itself. Everything else can be done in the VM itself.
But first the device needs to be disconnected from the Proxmox host and the kernel module should be unloaded from the host’s kernel to only keep loaded what is necessary. This is achieved with the following two commands.
[Host]$ qemu-nbd --disconnect /dev/nbd0
/dev/nbd0 disconnected
[Host]$ modprobe -rv nbd
rmmod nbd
The first command will disconnect the device from the host while the second command unloads the kernel module.
Increase the logical volume
Start the VM and login via SSH. The increased disc should already be available. But only the disc and the partition has been increased. The LVM is not yet resized to the new size.
As first the Physical volume configured in the LVM must be “resized”. This means that the physical volume needs to be notified of the changed size of the disc. This is simply done via the following command where /dev/vda2 is the partition containing the LVM.
[Guest]$ pvresize /dev/vda2
  Physical volume "/dev/vda2" changed
  1 physical volume(s) resized / 0 physical volume(s) not resized
After LVM has resized the physical disc, pvdisplay shows the free space on the physical volume.
[Guest]$ pvdisplay
  --- Physical volume ---
  PV Name               /dev/vda2
  VG Name               vg_104
  PV Size               19.51 GiB / not usable 2.00 MiB
  Allocatable           yes
  PE Size               4.00 MiB
  Total PE              4994
  Free PE               3584
  Allocated PE          1410
  PV UUID               29JmZW-HuKM-QvIs-3YxR-gfjo-uNii-8yyf8W
The volume group shows the free space as well. It shows the amount of free space not only in PE (physical extent) but also in GiB.
[Guest]$ vgdisplay
  --- Volume group ---
  VG Name               vg_104
  System ID
  Format                lvm2
  Metadata Areas        1
  Metadata Sequence No  4
  VG Access             read/write
  VG Status             resizable
  MAX LV                0
  Cur LV                2
  Open LV               2
  Max PV                0
  Cur PV                1
  Act PV                1
  VG Size               19.51 GiB
  PE Size               4.00 MiB
  Total PE              4994
  Alloc PE / Size       1410 / 5.51 GiB
  Free  PE / Size       3584 / 14.00 GiB
  VG UUID               QqcdTe-ynev-TL1M-z7B8-1mDQ-buoO-e4J8Hw
The lvdisplay shows the logical volume available. The LV Path can be used to resize the logical volume in the next step.
[Guest]$ lvdisplay
  --- Logical volume ---
  LV Path                /dev/vg_104/lv_root
  LV Name                lv_root
  VG Name                vg_104
  LV UUID                idAzH2-I1xM-3qHo-9x1G-FraN-T0LS-Jgbuy3
  LV Write Access        read/write
  LV Creation host, time 104.example.com, 2015-07-11 17:41:27 -0400
  LV Status              available
  # open                 1
  LV Size                4.91 GiB
  Current LE             1257
  Segments               1
  Allocation             inherit
  Read ahead sectors     auto
  - currently set to     256
  Block device           253:0

...
With all the information collected, the resize of the logical volume can be done with the following command. It uses the “Free PE / Size” from the vgdisplay output as well as the “LV Path” from the logical volume that should be increased
[Guest]$ lvresize --size +14G /dev/vg_104/lv_root
  Size of logical volume vg_104/lv_root changed from 4.91 GiB (1257 extents) to 18.91 GiB (4841 extents).
  Logical volume lv_root successfully resized
The 14GB of unassigned space is now assigned to the lv_root volume. The following commands confirm that the space is assigned now to the lv_root logical volume. The volume group is showing no free space any more while the logical volume has the increased size.
[Guest]$ vgdisplay
  --- Volume group ---
  VG Name               vg_104
  System ID
  Format                lvm2
  Metadata Areas        1
  Metadata Sequence No  5
  VG Access             read/write
  VG Status             resizable
  MAX LV                0
  Cur LV                2
  Open LV               2
  Max PV                0
  Cur PV                1
  Act PV                1
  VG Size               19.51 GiB
  PE Size               4.00 MiB
  Total PE              4994
  Alloc PE / Size       4994 / 19.51 GiB
  Free  PE / Size       0 / 0
  VG UUID               QqcdTe-ynev-TL1M-z7B8-1mDQ-buoO-e4J8Hw

[Guest]$ lvdisplay /dev/vg_104/vl_root
  --- Logical volume ---
  LV Path                /dev/vg_104/lv_root
  LV Name                lv_root
  VG Name                vg_104
  LV UUID                idAzH2-I1xM-3qHo-9x1G-FraN-T0LS-Jgbuy3
  LV Write Access        read/write
  LV Creation host, time 104.example.com, 2015-07-11 17:41:27 -0400
  LV Status              available
  # open                 1
  LV Size                18.91 GiB
  Current LE             4841
  Segments               2
  Allocation             inherit
  Read ahead sectors     auto
  - currently set to     256
  Block device           253:0

...
While the LVM volume is increased, the filesystem itself still believes nothing has changed. When “df” is used to check the free space, it still shows the old size.
[Guest]$ df -h
Filesystem                     Size  Used Avail Use% Mounted on
/dev/mapper/vg_104-lv_root     4.8G  603M  3.9G  14% /
tmpfs                          499M     0  499M   0% /dev/shm
/dev/vda1                      477M   25M  427M   6% /boot
With the following command, the filesystem is notified about the change in size.
[Guest]$ resize2fs /dev/vg_104/lv_root
resize2fs 1.41.12 (17-May-2010)
Filesystem at /dev/vg_104/lv_root is mounted on /; on-line resizing required
old desc_blocks = 1, new_desc_blocks = 2
Performing an on-line resize of /dev/vg_104/lv_root to 4957184 (4k) blocks.
The filesystem on /dev/vg_104/lv_root is now 4957184 blocks long.
From that moment on, the extra space can be used by the OS. A last check with the “df” utility proves that the new space is available and can be used.
[Guest]$ df -h
Filesystem                     Size  Used Avail Use% Mounted on
/dev/mapper/vg_104-lv_root   19G  607M   17G   4% /
tmpfs                          499M     0  499M   0% /dev/shm
/dev/vda1                      477M   25M  427M   6% /boot
If you wonder about the strange calculation of the Size and the Available value, this is not a bug in the df utility. A detailed explanation of this behaviour can be found in my post Utility df shows inconsistent calculation for ext filesystems.
Read more of my posts on my blog at http://blog.tinned-software.net/.

