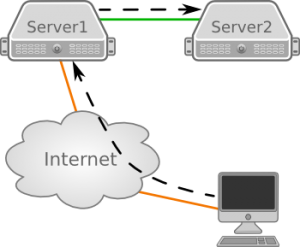
 When two servers are connected to each other but only one server has access to the internet, it is always uncomfortable to connect to the server without an internet connection, especially when files need to be copied to the server without a direct internet connection. There is a way to make it more comfortable to connect via ssh.
The Manual way
A direct ssh connection to Server2 is not possible. To reach Server2 you would first login to Server1 with a command like this:
[Client]$ ssh -l user1 Server1 -p 1234
This command will login to Server1 with the user “user1” and port “1234”. As soon as you have connected, you would start another ssh connection from Server1 to Server2. I assume here that Server2 has the IP address 10.0.0.2.
[Server1]$ ssh -l user2 10.0.0.2 -p 1234
When you need to copy files to Server2, you need to copy them first via scp to Server1 and then copy them via scp again to Server2.
Transparent multi-hop ssh
To logging in easier by adding ssh-keys to avoid entering the password every time, see my recent post about SSH passwordless login with SSH-key. Setup the ssh-key authentication between the client and Server1 as well as between the Client and Server2.
Configuring the ssh client using ~/.ssh/config will make the way to connect to Server2 even more straightforward. With the following configuration ssh is configured to connect to Server1 and then continue to connect to Server2 with one command line:
Host Server1
    Port 1234
    User user1
    HostName at2.tinned-software.net
    IdentityFile ~/.ssh/user1_server1_key-rsa

Host Server2
    Port 1234
    User user2
    HostName 10.0.0.2
    IdentityFile ~/.ssh/user2_server2_key-rsa
    ProxyCommand ssh Server1 nc %h %p
    ControlMaster auto
    ControlPath ~/.ssh/tmp/%h_%p_%r
The first Host configuration block is simply the configuration to connect to Server1. It just contains the details necessary to connect using the Port, User, HostName and ssh-key file (IdentityFile) listed here. The assumption is that there is one key generated for each server.
With the second configuration, the details to connect to Server2 are defined. It is important that you configure the hostname as you would use it to connect from Server1 to Server2.
The setting “ProxyCommand” specifies the command to use to connect to the server. As shown in the configuration, the command uses ssh to connect to Server1. Once connected to Server1 netcat (nc) is started with the parameter %h representing the hostname and %p representing the port.
If netcat is not yet installed on Server1, you can install it with the following command:
[Server1]$ yum install nc
Netcat establishes the connection between Server1 and Server2. As soon as the connection is established, the Client connects through this connection and authenticates with the key against Server2.
The settings “ControlMaster” and “ControlPath” are used to reuse connections. Without these configuration options, the complete connection procedure is performed for every connection you establish.
With these settings, the connection is reused and the time needed to connect is reduced. The configuration uses the directory “~/.ssh/tmp/” to store the connection details in. This directory is most likely not created yet:
[Client]$ mkdir ~/.ssh/tmp
From now on, Server2 can be directly accessed with a single command:
[Client]$ ssh Server2
This will directly connect you to Server2. What’s great about this solution is the ability to use it with scp as well:
[Client]$ scp path/to/local/file Server2:path/to/remote/file
This way you do not need to copy every file first to Server1.
Read more of my posts on my blog at http://blog.tinned-software.net/.


In this article, the description shows the ProxyCommand as follows.
This uses the netcat (nc) command, but actually plain ssh can be used to
achieve the same thing. SSH provides the “-W” option for this. The ProxyCommand
line then looks like this.