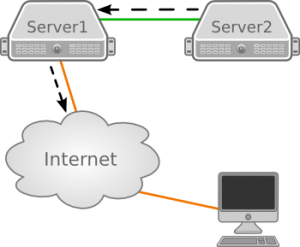
 When two servers are connected to each other but only one server has access to the internet, it can be complicated to connect to the server without an internet connection when you need to do things like update packages from online repositories. This post will explain how to setup internet access via an intermediary server that does have internet access.
Server1 has direct internet connectivity, as such, it is possible to user Server1 to reach the Server2 without a direct internet connection to Server2. With ssh, the easiest way is to connect to Server1 and from there connect via ssh to the Server2, but this does not solve the problem of gaining connectivity from Server2 to the internet. An outgoing connection would be needed to update packages or install packages from the operating system repository.
For this, Server1 needs to act as a router to forward the traffic to the internet, in a similar arrangement to that used by an ordinary home router. The following will explain the configuration based on two CentOS servers connected to the internet in the arrangement described above.
Configure Server1 as a router
The IP package forwarding feature is not enabled by default on Linux. It is necessary to enable packet forwarding to let Server1 act as a router for Server 2. To enable packet forwarding, execute the following command on Server1:
[Server1]$ echo 1 > /proc/sys/net/ipv4/ip_forward
This change will take effect immediately but will not be permanent. To enable it permanently, edit the “/etc/sysctl.conf” file and change the following setting to “1”. It might be that this setting is already defined as “1” but commented out. In this case remove the leading “#” to uncomment it:
# Uncomment the next line to enable packet forwarding for IPv4
net.ipv4.ip_forward=1
With this enabled, forwarding is not yet working as the forwarding rules need to be configured in iptables. In the following commands I assume that eth0 on Server1 is the interface connected to the internet and eth1 is the direct connection between Server1 and Server2.
The interface connected to the internet (eth0) needs to be configured to forward and Masquerade the traffic to the internet. This is done by executing the following command:
[Server1]$ iptables -t nat -A POSTROUTING -o eth0 -j MASQUERADE
This is temporarily loaded into iptables. To configure this permanently, add this rule to the iptables configuration file.
Depending on the configuration of the rest of your firewall, you might need to allow traffic coming from Server2. The servers are connected via eth1 in my example. This results in the following iptables rule to ensure that the traffic from the Server2 is accepted on Server1:
[Server1]$ iptables -A RH-Firewall-1-INPUT -i eth1 -j ACCEPT
As with the previous rule, this is just temporary and needs to be stored permanently in the iptables configuration file.
Configure the gateway on Server2
With Server1 configured as a router and accepting our traffic, we need to tell Server2 to send its traffic to Server1. This is done by simply adding or modifying the default route. I assume for this that Server1 is assigned the IP 10.0.0.1 on its eth1 interface and that Server2 has another IP address on the same private network (for example: 10.0.0.2).
[Server2]$ route add default gw 10.0.0.1
The above command will again temporarily define the default gateway. To set it permanently, add the gateway to the network configuration for eth1. The method of doing this will vary depending on linux distribution you are using.
On Redhat / CentOS the configuration for the network interfaces can be found at /etc/sysconfig/network-scripts/ifcfg-eth1. This configuration file contains just the configuration for eth1 and the setting “GATEWAY 10.0.0.1” should be added.
On a Debian-based system the network configuration for all interfaces is located in “/etc/network/interfaces”. Add the “gateway 10.0.0.1” setting for interface eth1.
It is important that you configure the default gateway only for one interface. As soon as the gateway is configured you should be able to reach the internet from Server2.
Read more of my posts on my blog at http://blog.tinned-software.net/.


