
Keeping your Mac clean and free of unwanted files is essential if you want to keep it running like new. But the problem is that users sometimes tend to accidentally delete files that they need later on. Recovering them is possible, of course, but not as easy a task as it sounds. However, if you have the right tools for the job, you can recover deleted files in no time. Let’s look at three different ways to get back deleted files on a Mac computer.
Restore from Time Machine
This method relies on the fact that deleted items sit in your Trash folder until you get rid of them permanently or for a period of 30 days. After 30 days they are automatically sent to Time Machine, which is the Mac’s native system recovery utility. To recover specific files from Time Machine, follow the steps shown below (Taking Mojave as example):
Step 1: If you have done a Time Machine backup to an external drive, make sure it is connected to the computer.
Step 2: Open a Finder window and navigate to the directory where the files used to be. For example, if they were in the Documents folder, open that folder in Finder.
Step 3: Open Time Machine from Launchpad, which is located in the Other folder. You will see a timeline on the right edge of the screen. You can change the time using the Up/Down arrows shown on the screen.
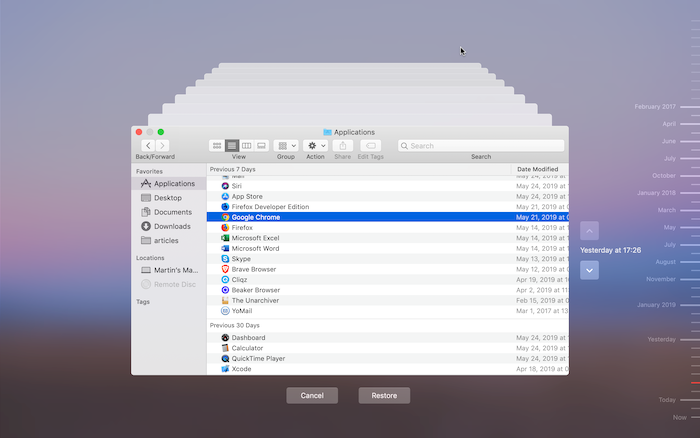
Step 4: Select the items you need and click on Restore to put them back where they were. You can also preview files by pressing Space Bar.
Of course, this method assumes that you have turned Time Machine on and done backups to a specified drive or disk. If not, then you have to find another way to recover your deleted files. Here’s another method you can try.
From iCloud Backup
If you have backed up your data to iCloud, this is another way you can use to try and retrieve deleted files. iCloud is Apple’s cloud service, and it is highly recommended that you back up all important data here in case something like this happens. Getting back your files from iCloud Drive is simple:
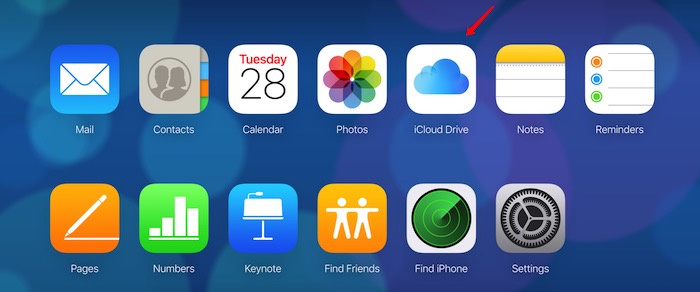
Step 1: Go to iCloud.com and click on iCloud Drive. You’ll see an option called Recently Deleted. Click on that.
Step 2: Navigate to the folder where the files were deleted from and select them. Now click on Restore to put them back in the same folder.
This method works whether you deleted the files in iCloud, your Mac or even your iOS device. However, you won’t be able to get them back if they were permanently deleted from iCloud.com. If your files are unrecoverable using the first two methods, try this third method.
TestDisk Free Data Recovery Software
TestDisk, also known as Photorec, is a free file undelete program developed by Christophe Grenier of CG Security. It works by recovering deleted files based on the partition in which they were stored. The best part about the program is that you can recover files by type. So, if you only want to recover Word documents or Excel spreadsheets, you can do that with this utility. There is a little bit of command line work involved, but if you follow the steps below you should be good to go.
Step 1: Go to TestDisk official website and download the Mac version from there. The file is archived in tar.bz2 format. You have to unzip the file via an app like Unarchiver or in Terminal with the command: tar -xvzf testdisk-7.1-WIP.mac_intel.tar.bz2
Note that if Homebrewa> is installed on the Mac, you can install the app via this command:
$ brew install testdisk
Step 2: TestDisk is a command line based tool so you need to open Terminal for further operations. First go to TestDisk folder:
$ cd testdisk-7.1-WIP
Step 2: Enter your password after the final command and hit Enter. The “sudo” gives you root access, which you might need in order to see all the drive partitions on your Mac. This is a command line utility, so when the program opens you’ll see something like this:
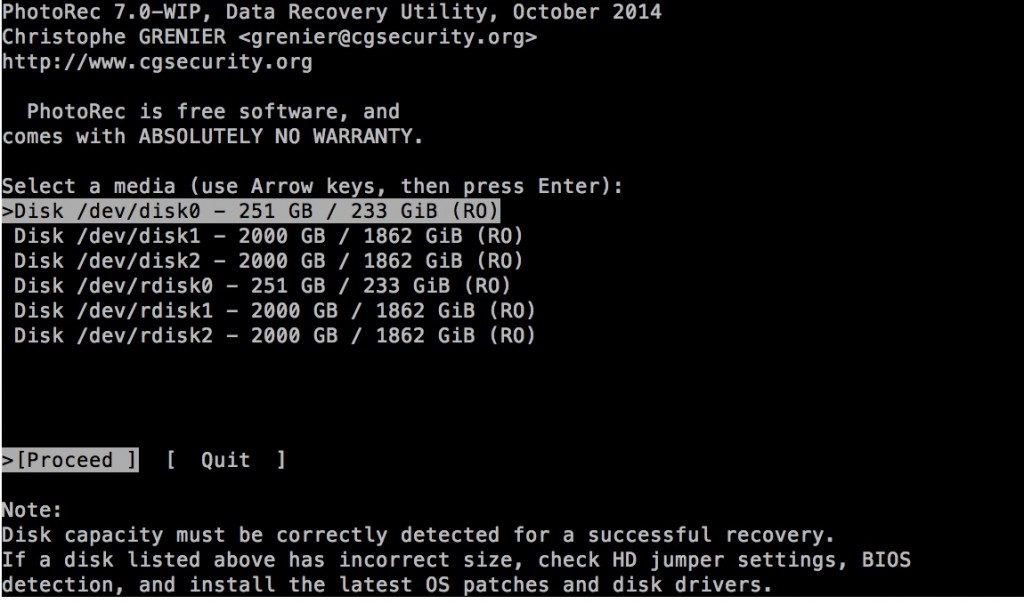
Step 3: Select the disk where the files were deleted from by using the up/down arrow keys on your keyboard. Press Enter to proceed.
Step 4: You will now see the entire list of partitions on your Mac’s hard drive, beginning with the entire disk, then the system partition, after which all the partitions you created will be listed. Select the right partition using the up/down arrow.
Step 5: You can hit Enter to use the Search option, or use the right arrow to select File Opt, which gives you a list of file types to look for. Use the letter s to unselect all options, and then highlight the one you want using the letter x.
Step 6: Record your settings by pressing the letter b, then hit Enter to confirm. You’ll be taken back to the search page, where you can hit Enter where the Search option is highlighted.
Step 7: The next step is to confirm the file system of the partition where the deleted files were. Highlight Other and hit Enter.
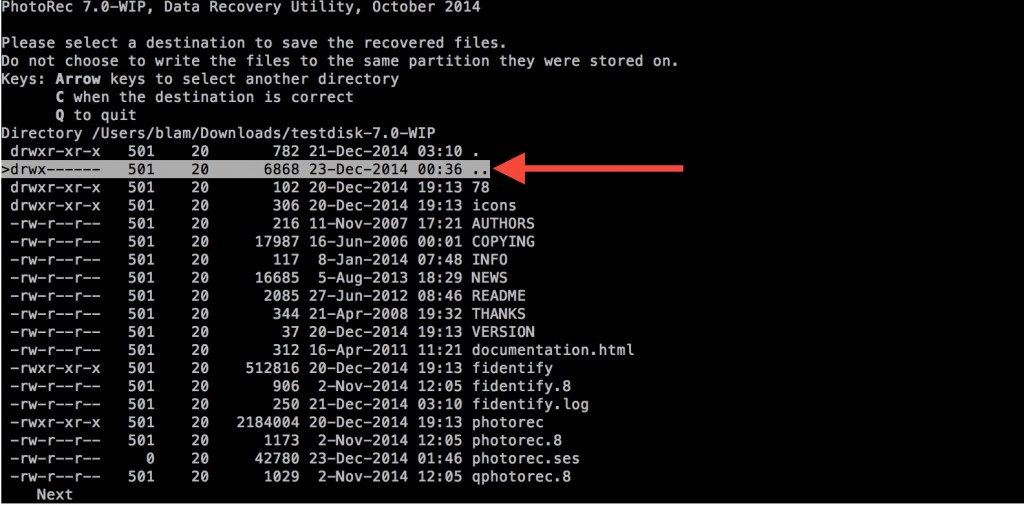
Step 8: Now you need to tell the program where to undelete the files to, but make sure you don’t select the same partition that they were stored in prior to being deleted. This is important because you don’t want to overwrite the deleted files. It is also important that you navigate to the partition before confirming it with the letter C, otherwise the files will be recovered to your current partition, not the one that is highlighted on the screen. This can be confusing, so make sure you first navigate to the correct partition, then press C to confirm.
Premium Software for Data Recovery
There are cases that you forgot backing up the Mac with Time Machine and unable to get the file recovered by TestDisk. What can you do in such a case? Fortunately there is some premium software out there to help you recover deleted files on a Mac with a modern user interface. We will share two examples here.
Note that, no matter which app you are going to use, it is highly recommended to test the free trial first as no app can guarantee 100% recovery for lost files.
Disk Drill is one of the most popular data recovery apps designed for Mac. The best part of Disk Drill app is that it can recover 200+ types of files from various file systems. It also has a few nice built-in utilities such as data back and disk cleanup.
DiskGeeker is another great data recovery app that supports Windows and Mac. It has a much more clean user interface than Disk Drill and the scanning speed is a bit faster. In addition, DiskGeeker can recover files from accidental deletion, lost partitions or external disks. What’s more, DiskGeeker has better support in regards of responding time and expertise.
Read more of my posts on my blog at https://blog.tinned-software.net/.

