
 When you have a replication error that does not allow you to fix it as described in Fix MySQL replication error you need to repair it by restoring the replication completely.
Understanding the Replication problem
MySQL replication is built upon some simple but effective steps. Understanding them is the key to understanding where problems come from and how to fix them.
The master of the replication will keep track of all modifying queries in the so-called bin-log. This bin log is stored on the master server. The configuration defined by the options “max_binlog_size” and “expire_logs_days” sets how many log-files to keep
The slave requests the bin-log from the master and stores them into the replay-log. From there the slave process (a single thread) is executing the changes one by one to replay the modifications. In this way the slave will be modified in the same way as the master.
The repair as explained in Fix MySQL replication error does not work when the slave loses connection to the master for too long. When the slave looses connection for too long, the master continues to write data to the bin-log. At some point, the master reaches the configured limit for the bin-logs and starts deleting the oldest ones. The magic moment is when the master deletes the bin-log which contains the last replicated log position that the slave has seen.
Now the slave cannot find the next modification to replicate. The replication is unrepairable broken. The only solution is to re-setup the replication to get it to work again. This includes a new dump of the master data to be imported to the slave.
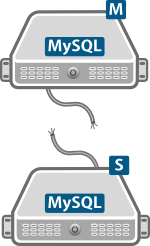
Preparing the Slave
The data from the slave will be shortly removed and reimported. To not cause any strange behaviour in accessing applications I propose stopping any access to the slave during this procedure. From here on I will call the master server Server1 and the slave Server2.
In a master-master setup, make sure that the Server1 which is the master with correct dataset does not replicate the changes from the Server2. To do this, stop the slave on Server1. This will avoid that the re-import of the data (including the DROP statements) are replicated back to Server1.
mysql> SLAVE STOP;
As long as the slave server was already configured to the master, you might skip this step. Executed on Server2 it will define the master server’s IP address and credentials for the retrieval of the bin-logs from Server1 (the master).
If for some reason you had to delete the complete data directory of mysql and recreated it using “mysql_install_db”, you will need to execute this SQL command before the import of the dump to make sure the master position can be correctly set during the import.
mysql> CHANGE MASTER TO MASTER_HOST = '123.123.123.101', MASTER_USER = 'replication_user', MASTER_PASSWORD = 'UserPassword';
Re-import the data to the slave
As the content of the databases are completely out of sync, a new dump of the Server1 needs to be created. The parameter “–master-data” will include the “CHANGE MASTER TO” statement into the dump. This will automatically set the correct bin-log coordinates for Server2 (the slave) to start replication.
mysqldump --all-databases --master-data=1 >mysql_dump_$(hostname)_$(date +%Y-%m-%d_%H-%M).sql.dump
Copy the dump from Server1 to Server2. Deleting the content of the Server2 is not needed as the dump will contain DROP TABLE lines to ensure the tables are deleted before they are re-imported.
mysql <mysql_dump_Server1_2015-03-18_12-47.sql.dump
Execute the above command to import the dump to Server2. After the dump is imported to Server2, the user tables are imported as well. For the changes to take effect, execute the following SQL command. This with reload the privileges from the re-imported tables.
mysql> FLUSH PRIVILEGES;
After that, login is only possible with the credentials from Server1. The bin-log coordinates should be set according to the dump. This can be checked by the following SQL statement.
mysql> SHOW SLAVE STATUS;
With the master position set, you can enable the slave replication on the Server2. This will replicate all the changes since the Server1 dump has been created.
mysql> SLAVE START;
When the replication has caught up, you have a working Master-Slave replication.
Re-enabling replication for master-master
To get the master-master replication back, get the bin-log coordinates from Server2. Those coordinates will be used as the start coordinates for the replication from Server2 to Server1. It’s important that since the import of the data from Server1, no data has been written to Server2.
mysql> SHOW MASTER STATUS;
With this command you will see the bin-log coordinates of Server2. These coordinates will be used on Server1 to define the coordinates Server1 should start replicating from. As mentioned at the beginning, stopping the slave on Server1 is important. As it is still stopped, we can change the coordinates and start it now.
mysql> CHANGE MASTER TO MASTER_LOG_FILE='log-bin.000012', MASTER_LOG_POS=107;
mysql> SLAVE START;
This will start the replication on Server1 as well. With this done you have a working master-master replication. To check its full working condition, check the “SHOW SLAVE STATUS;” information on both servers.
Debian notice
If you work on Debian, The init-script for MySQL is slightly different then the one from RedHat distributions like RHEL or CentOS. The Debian init-script uses a special MySQL user to connect. The init-script connects to MySQL, for example, to inform it to shutdown. These credentials to connect are generated during the initial setup of mysql.
When the dump includes the user tables of MySQL the credentials used by the init-script will not have the expected password any more. The passwords of the two MySQL servers are identical now.
The configuration of these passwords can be found in the /etc/mysql/debian.cnf configuration file. You can either change the password in MySQL or change the configuration file to the password of the other server.
Read more of my posts on my blog at https://blog.tinned-software.net/.

