
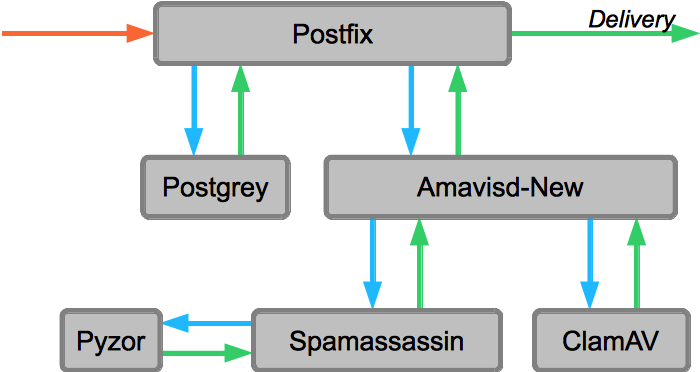
 In the setup described in this post, postfix passes incoming mail on to amavisd-new. There, the emails get checked for viruses and spam. After the emails are checked, they are sent back to postfix for delivery.
Install Components
The following commands will install the required components for this setup. They include Postgrey policy server implementing greylisting, amavisd-new as a wrapper between postfix and other components like Spamassasin as the spam filter, ClamAV as the virus scanner, and SPF and DKIM libraries.
yum install spamassassin amavisd-new clamav clamd pyzor perl-Mail-SPF perl-Mail-DKIM postgrey tmpwatch lzop
At the time of writing, I have noticed problems while installing amavisd-new while having the “epel” repository installed, but the package is available from the rpmforge repository as well. Here you can find details about the error message and a temporary solution. If you have both repositories installed, make sure you have configured yum repository priorities with yum-plugin-priorities to avoid errors during installation and later system updates via “yum update”.
Configuring Postfix
Amavisd-new needs to be integrated into postfix to receive the unfiltered emails from the postfix queue. This is done by adding a line of parameters to the smtpd.
In the /etc/postfix/master.cf configuration file you will find a line for the smtpd. Add a line with “-o content_filter=smtp-amavis:[127.0.0.1]:10024” directly underneath it. The result should look like this.
smtp      inet  n       -       n       -       -       smtpd
        -o content_filter=smtp-amavis:[127.0.0.1]:10024
The above configuration will send the emails to amavisd-new. To allow amavisd-new to send them back to postfix, we need to add additional configuration. As well as as some for the amavisd-new daemon itself.
# amavisd-new deamon
smtp-amavis unix -      -       -     -       2  smtp
        -o smtp_data_done_timeout=1200
        -o disable_dns_lookups=yes
# smtpd deamon for amavisd-new to send mails back to postfix
127.0.0.1:10025 inet n  -       -     -       -  smtpd
        -o content_filter=
        -o strict_rfc821_envelopes=yes
As amavisd-new will send alert messages, the alias should be configured to send those messages to root or some other recipient. Therefore edit the /etc/aliases file and add the following line. You might find that this line has already been added when installing the amavisd-new package via yum.
virusalert: root
Also Postgrey needs to be integrated into the postfix configuration. Postgrey acts as a so-called Policy Server. Such a policy server is used by Postfix to delegate the decision to accept or deny emails to an external process. To instruct postfix to ask the Postgrey policy server, the highlighted item needs to be added to the “smtpd_recipient_restrictions” configuration of the /etc/postfix/main.cf config file.
smtpd_recipient_restrictions = permit_sasl_authenticated,permit_mynetworks,check_policy_service unix:/var/spool/postfix/postgrey/socket,reject_unauth_destination
The unix socket shown above for the Postgrey policy server will be configured in the next step. This is also the default location as it is configured in CentOS.
Configuring Postgrey
Postgrey is a greylisting policy server. The idea behind this greylist is simple. It counts on the non-RFC conformant behaviour of spam mail servers. Postgrey will reject emails with a temporary error code when received for the first time. To identify the sender the triplet CLIENT_IP / SENDER / RECIPIENT is used. When the sender retries to deliver the mail, Postgrey accepts it. For more details, see the Postgrey website.
To configure Postgrey on a CentOS server, create the file /etc/sysconfig/postgrey and open it with your favourite editor. In this configuration file add the following line. This line will contain all configuration options for the Postgrey daemon.
OPTIONS="--max-age=365 --delay=60 --unix=/var/spool/postfix/postgrey/socket"
These options will instruct Postgrey to delay the delivery of the email by 60 seconds. max-age defines how long Postgrey will remember a successful delivery and allow subsequent messages straight through. For more options, please check the manual page available on your server via “perldoc postgrey“.
Configure Amavisd-New
In the amavisd-new configuration the following settings need to be changed. To do this, edit the /etc/amavisd.conf configuration file with you favourite editor.
$mydomain = 'example.com';   # a convenient default for other settings
@mynetworks = qw( 127.0.0.0/8 [::1] );
$sa_spam_subject_tag = '[Spam] ';
When the email is passed on to amavisd-new, an additional “Received” header is added to the email. If you don’t want to show this information on outgoing emails, the following configuration added to the /etc/amavisd.conf configuration file will avoid these headers being added.
# disable the "Received" headers to be added to the mail header
$allowed_added_header_fields{lc('Received')} = 0;
The configuration for the different components like spamassasin and clamscan are already in the default configuration as it is installed from the package. The clamd configuration is also already inside the configuration file of amavisd-new, but commented out. Find the following part in the /etc/amavisd.conf configuration file and uncomment it.
### http://www.clamav.net/
['ClamAV-clamd',
  \&ask_daemon, ["CONTSCAN {}\n", "/var/run/clamav/clamd.sock"],
  qr/\bOK$/m, qr/\bFOUND$/m,
  qr/^.*?: (?!Infected Archive)(.*) FOUND$/m ],
# NOTE: run clamd under the same user as amavisd - or run it under its own
#   uid such as clamav, add user clamav to the amavis group, and then add
#   AllowSupplementaryGroups to clamd.conf;
# NOTE: match socket name (LocalSocket) in clamav.conf to the socket name in
#   this entry; when running chrooted one may prefer a socket under $MYHOME.
To be prepered for the next step, spamassasin, amavisd-new can be configured to always add “X-Spam-…” headers. These headers can be very helpful to compare why one email was detected as spam while another email was not. Usually these headers are only added to emails with a score high enough to be spam. To have them always in the headers, change the following setting in the amavisd-new configuration file located at /etc/amavisd.conf.
$sa_tag_level_deflt = -999; # add spam info headers if at, or above that level
This setting is by default set to 2.0 which causes the spam headers only to be added when the score is above that value. If you want the header to be always included, this needs to be set to a high negative value. This is because of the fact that some checks (like SPF or DKIM if they are passed) add negative score values which can result in an overall negative score.
Configure Spamassassin
Unlike amavisd-new, the configuration of spamassassin is quite empty after installation.
Edit /etc/mail/spamassassin/local.cf
# The score from which an email will be considered spam
required_hits           5.0

# Subject prefix if spam is detected
rewrite_header Subject  [SPAM]

# Disable encapsulate spam in an attachment
report_safe             0

# Configure the Bayes system
use_bayes               1
bayes_auto_learn        0
bayes_path              /etc/mail/bayes/bayes
bayes_file_mode         0666

# Enable or disable network checks
skip_rbl_checks         0

# pyzor configuration
use_pyzor               1
pyzor_options           --homedir /etc/mail/spamassassin
pyzor_timeout           5
This configuration enabled Pyzor. This is a checksum-based, distributed, collaborative, spam-detection-and-filtering network. Additionally to the explicitly enabled checks, there are others that are enabled by default like the DKIM and SPF checks.
The configured directory for the bayes system needs to be created. To do this run the following command.
$ sudo mkdir /etc/mail/bayes
Setup Pyzor
Pyzor needs to create its configuration files, and the server list needs to be discovered. To do this, run the following command as root or via sudo.
pyzor --homedir /etc/mail/spamassassin/ discover
Learning and reporting spam
The different components of our spam filtering are able to learn from spam emails. The following will show how you can run these learning mechanisms manually if you need to. These mechanisms can of course be used in any script to automate this procedure.
The commands have the necessary command-line arguments to read their information directly from an mbox file. This is the file format we use as well for mail storage (see Setup Dovecot with PAM authentication and SSL on CentOS). Make sure the mbox file you provide does not include any non-spam messages as all messages of this mbox file will be reported as spam.
The first learning mechanism is the bayes filter. When you teach it spam massages, it will create a local database and store the learned information in it. If you accidentally teach it non-spam email is spam, you always have the possibility to clean the database and start over.
sa-learn --spam --showdots --mbox /home/username/mail/spam-mailbox-folder
Pyzor is a community driven database. When you submit your spam mbox files, the messages get examined and hash values are generated from them. These hash values are sent to the server. If you accidentally submit non-spam messages, you can not just start over. You have to revoke the message which will mark it as not spam. deleting a submitted hash is not possible.
pyzor --homedir /etc/mail/spamassassin/ report --mbox </home/username/mail/spam-mailbox-folder
Finalize setup
Most of the configured components run as daemons. Now we have the proper configuration, we need to start (or restart if they were already running) them. As we have changed the configuration of postfix, we need to restart it, too.
/etc/init.d/clamd restart
/etc/init.d/spamassassin restart
/etc/init.d/amavisd restart
/etc/init.d/postgrey restart
/etc/init.d/postfix restart
The final step in the configuration is to instruct the server to start the daemons when booting. Without this configuration the mail system would not properly work after a system restart. To configure the daemons we have set up to start on boot, execute the following commands.
chkconfig spamassassin on
chkconfig amavisd on
chkconfig clamd on
chkconfig postgrey on
The services configured to start on boot can be checked by just running “chkconfig” without any parameters. For more details please see the man page for chkconfig(8).
Testing the Setup
Testing your setup is always very important. Especially in a setup like this where many components are configured together.
Testing postgrey
Testing the postgrey working should be the first thing you do. Postgrey will reject the first delivery attempt from the remote mail server with a temporary error code. A properly configured remote mail server should wait for some time and try to deliver the message again. As soon as the remote mail server retries delivery of the email, postgrey will accept it and remember itt. As we want to see this behaviour in the logs, we should start our testing with postgrey.
The test is quite easy. All you need is an email account not handled by your server. Take one of the many free email providers out there if you do not already have one. Before we send an email to our mail server we will open the logfile to follow the process of receiving the email.
tail -f /var/log/maillog | grep postgrey
When you now send a test email to the mail server the email gets rejected. The error code 450 sent back to the remote mail server to indicate a temporary delivery failure and a properly configured remote mail server should just try again after some time.
postgrey[1698]: action=greylist, reason=new, client_name=mail-bk0-f54.google.com, client_address=209.85.214.54, sender=sender.name@gmail.com, recipient=recipient@example.com
postfix/smtpd[1663]: NOQUEUE: reject: RCPT from mail-bk0-f54.google.com[209.85.214.54]: 450 4.2.0 <recipient@example.com>: Recipient address rejected: Greylisted, see http://postgrey.schweikert.ch/help/popmail.at.html; from=<sender.name@gmail.com> to=<recipient@example.com> proto=ESMTP helo=
After some minutes (depending on the remote mail server’s configuration) the remote mail server starts another attempt. This time the mail server accepts the email. This is indicated by the “action” and the “reason” field. In this case the email is accepted because the triplet is known.
postgrey[1698]: action=pass, reason=triplet found, delay=380, client_name=mail-bk0-f54.google.com, client_address=209.85.214.54, sender=sender.name@gmail.com, recipient=recipient@example.com
If your email came from a remote mail server that was in the whitelist, the logfile would show it like in the example below. In this case the log message would clearly state that it was accepted because the mail server is in the “client whitelist”. The whitelists are located under /etc/postfix/ if you need to modify them.
postgrey[3225]: action=pass, reason=client whitelist, client_name=mail-bk0-f45.google.com, client_address=209.85.214.45, sender=sender.name@gmail.com, recipient=recipient@example.com
Testing backup virus scanner
The amavisd-new configuration has a primary virus scanner configuration as well as a backup. The primary scanner is clamd which runs as a daemon, but if the daemon is not running for some reason, clamscan (the command line client) is used. To test this, stop clamd and send a mail to the server.
To send a mail to the server you can use the Mailserver-Test. You should find in the /var/log/maillog the following lines that indicate that amavisd-new is checking backup scanners if the primary fails.
amavis[3715]: (03715-01) (!)connect to /var/run/clamav/clamd.sock failed, attempt #1: Can't connect to UNIX socket /var/run/clamav/clamd.sock: 2

amavis[3715]: (03715-01) (!)WARN: all primary virus scanners failed, considering backups
Testing spam detection
To test the spam detection, we need to trigger an email that is detected as spam. This can be done by sending an email with the following in the mail content. You can find the details about this GTUBE test on the Spamassassin website.
Spamassassin supports the detection of GTUBE (Generic Test for Unsolicited Bulk
Email) test string. When this string is placed at the email content, it will
detect the email as spam. According to the configuration of Spamassassin, the
subject will be modified as configured. Send yourself an email containing the
following line (in upper case and with no white spaces and line breaks):

XJS*C4JDBQADN1.NSBN3*2IDNEN*GTUBE-STANDARD-ANTI-UBE-TEST-EMAIL*C.34X

Send this test mail from an email account not handled by your mail server.
When you receive the email on your server, spamassassin will modify the subject as configured. In this example the subject is prefixed with “[SPAM] “. If you see the email with this prefix in the email subject, then spamassassin was successfully integrated into the email processing.
[Spam] The GTUBE test email
To see more details about why the email was considered spam, you can check the raw email. In most email clients you have the possibility to show the raw email, or as it is sometimes called, the “Message source” (Thunderbird, Postbox). When you open the raw email, you notice at the beginning the email header containing besides other things the “From”, “To”, “Date” and “Subject” lines. Within the headers you will find “X-Spam-…” lines which contain the results of the spam detection. As you can see in the example below, the spam score is 999,9 but already a score of 6,2 is enough to consider it spam. When we check further, the list of tests and their score is shown. For GTUBE it gets a score of 1000 and for DKIM_SIGNED 0.1 but for DKIM_VALID and DKIM_VALID_AU the score is reduced by 0.1 and so on. If you think an email was falsely detected as spam, you can check here why the email got such a high score.
X-Spam-Flag: YES
X-Spam-Score: 999.9
X-Spam-Level: ****************************************************************
X-Spam-Status: Yes, score=999.9 tagged_above=2 required=6.2
  tests=[DKIM_SIGNED=0.1, DKIM_VALID=-0.1, DKIM_VALID_AU=-0.1,
  FREEMAIL_FROM=0.001, GTUBE=1000, SPF_PASS=-0.001] autolearn=no
Testing virus detection
In the same way as the spam detection we want to test the virus scanner. As it would be a stupid idea to send a real virus around, we will use the “EICAR Standard Anti-Virus Test File” to do this. If you want to know more about this, please visit the EICAR website. If you try to send it from a free mailer, you might run in problems already there. Some of them reject the email before they even accept it for delivery, but this is not a problem as you can send it from one account on your server to another one as this will not make any difference for this test.
To do this, create a file on your local computer with the following content. This is the test file that which will cause clamav to detect a virus in your email. Don’t be afraid this is not a virus and will not harm your computer! It was specially designed to test virus scanners without harming your computer. For more details check the EICAR website.
X5O!P%@AP[4\PZX54(P^)7CC)7}$EICAR-STANDARD-ANTIVIRUS-TEST-FILE!$H+H*
When we send the email with this attachment it will not arrive at its destination recipient. So we need to check the /var/log/maillog for it to see what is happening. The only result we will see is a notification email at the account that receives the “virusalert@example.com” email. According to our configuration we did earlier, this would be root.
amavis[6543]: (06543-03) ESMTP::10024 /var/amavis/tmp/amavis-20140108T082816-06543-WsWIlSik: <info@example.com> -> <username@example.com> SIZE=2373 Received: from mail.example.com ([127.0.0.1]) by localhost (host.example.com [127.0.0.1]) (amavisd-new, port 10024) with ESMTP for <username@example.com>; Thu, 08 Jan 2014 09:44:58 +0100 (CET)
amavis[6543]: (06543-03) Checking: 8jPZzQyUKh-G <info@example.com> -> <username@example.com>
amavis[6543]: (06543-03) local delivery: <> -> virus-quarantine, mbx=/var/virusmails/virus-8jPZzQyUKh-G
...
amavis[6543]: (06543-03) SEND from <virusalert@example.com> -> <virusalert@example.com>,ENVID=AM.06543-03.20140108T084500Z@host.example.com 250 2.0.0 from MTA(smtp:[127.0.0.1]:10025): 250 2.0.0 Ok: queued as C28CC101DBE
amavis[6543]: (06543-03) Blocked INFECTED (Eicar-Test-Signature) {DiscardedInbound,Quarantined}, [123.123.123.123] <info@example.com> -> <username@example.com>, quarantine: virus-8jPZzQyUKh-G, Message-ID: <63980287.3110701@example.com>, mail_id: 8jPZzQyUKh-G, Hits: -, size: 2373, 2409 ms
You should find similar log entries to the one shown above. These show that clamav detected as expected the attachment as being infected by “Eicar-Test-Signature”. As a result the email is blocked and a notification is sent to virusalert@example.com showing the details.
To check this email directly from the console you can use “mail”. Run it as user root and it will show all emails the user root has in its inbox.
$ mail -u root
Heirloom Mail version 12.4 7/29/08.  Type ? for help.
"/var/mail/server": 2 messages 1 unread
    1 Mail System Internal  Mon Nov 18 15:19  13/624   "DON'T DELETE THIS MESSAGE -- FOLDER INTERNAL DATA"
>U  2 Content-filter at at  Thu Jan 08 09:45  81/3018  "VIRUS (Eicar-Test-Signature) in mail FROM <info@example.com>"
&
As this example shows, the user has one virus alert message in his inbox. The “>” indicates that this is the next message to show. The “U 2” shows that this email is unread and has the number 2. type in the prompt the number 2 and hit enter to see the details of the email.
Message  2:
From virusalert@example.com  Thu Jan 08 09:45:01 2013
Return-Path: <virusalert@example.com>
X-Original-To: virusalert@example.com
Delivered-To: virusalert@example.com
Content-Type: multipart/mixed; boundary="----------=_1385628298-6543-0"
From: "Content-filter at host.example.com"
 <virusalert@example.com>
Date: Thu, 28 Nov 2013 09:44:58 +0100 (CET)
Subject: VIRUS (Eicar-Test-Signature) in mail FROM <info@example.com>
To: <virusalert@example.com>
X-UID: 284
Status: RO
X-Keywords: nonjunk
Content-Length: 2097

Part 1:
Content-Type: text/plain; charset="UTF-8"
Content-Disposition: inline

A virus was found: Eicar-Test-Signature

Scanner detecting a virus: ClamAV-clamd

Content type: Virus
Internal reference code for the message is 06543-03/8jPZzQyUKh-G

According to a 'Received:' trace, the message apparently originated at:
  [123.123.123.123], hostname.local ip123123123123.provider.domain.com
  [123.123.123.123] using TLSv1 with cipher DHE-RSA-CAMELLIA256-SHA (256/256
  bits) No client certificate requested

Return-Path: <info@example.com>
From: Info <info@example.com>
Message-ID: <52970287.3010701@example.com>
Subject: av test email
The message has been quarantined as: virus-8jPZzQyUKh-G

The message WAS NOT relayed to:
<gsteinbeis_test@example.com>:
   250 2.7.0 Ok, discarded, id=06543-03 - INFECTED: Eicar-Test-Signature

Virus scanner output:
  p006: Eicar-Test-Signature FOUND
  p003: Eicar-Test-Signature FOUND


Part 2:
Content-Type: text/rfc822-headers; name="header"
Content-Disposition: inline; filename="header"
Content-Description: Message header section

Return-Path: <info@example.com>
Received: from hostname.local (ip123123123123.provider.domain.com [123.123.123.123])
  (using TLSv1 with cipher DHE-RSA-CAMELLIA256-SHA (256/256 bits))
  (No client certificate requested)
  by host.example.com (Postfix) with ESMTPSA id 5AE62101DBD
  for <username@example.com>; Thu, 28 Nov 2013 09:44:58 +0100 (CET)
Message-ID: <52970287.3010701@example.com>
Date: Thu, 28 Nov 2013 09:44:55 +0100
From: Info <info@example.com>
User-Agent: Postbox 3.0.8 (Macintosh/20130427)
MIME-Version: 1.0
To: username@example.com
Subject: clamav test email
References: <5296FE3C.3040807@example.com>
In-Reply-To: <5296FE3C.3040807@example.com>
Content-Type: multipart/mixed;
 boundary="------------010908080209080006020005"
&
In this email you get not only the notification that an infected email was found but it gives you details about what it found and where the email came from. The alert email also tells you where you can find the quarantined email if you need to. The location of the quarantine files is configured in the /etc/amavisd.conf file. The default location is “/var/virusmails/”.
Troubleshooting
I noticed that for some reason in my 64 bit CentOS 6 installation on Amazon AWS the following problem occurred (on a 32 bit version this problem did not occur). Without further analysing the reason, I want to show you how you can solve this if you have the same issue.
When you check the /var/log/audit/audit.log file you will see an entry similar to this.
type=AVC msg=audit(1383904451.884:604436): avc: denied { search } for pid=25203 comm="clamscan" name="amavis" dev=xvde ino=34651 scontext=unconfined_u:system_r:clamscan_t:s0 tcontext=system_u:object_r:amavis_var_lib_t:s0 tclass=dir
This indicates that clamscan is not allowed to access the file from amavisd-new. In detail, the selinux context of clamscan is clamscan_t and this does not have access to the files from amavisd-new with context amavis_var_lib_t.
amavis[1356]: (01356-01) (!)run_av (ClamAV-clamscan) FAILED - unexpected exit 2, output="WARNING: /var/amavis/tmp/amavis-20131108T112202-01356-OZbzwVO6/parts: Can't access file\n/var/amavis/tmp/amavis-20131108T112202-01356-OZbzwVO6/parts: Permission denied"
As the /var/log/maillog as shown above indicates, amavisd-new places the email to scan in the /var/amavis/tmp/ directory which has the amavis_var_lib_t context. You can check this by yourself with “ls -Z /var/amavis/”. The -Z option shows the selinux context.
The problem is well described at http://lists.centos.org/pipermail/centos-docs/2012-October/004994.html. The solution proposed there is to create the necessary rules to allow clamscan to access the files amavisd-new creates.
For the proposed solution create a file called se_clamav_amavis.te with your favourite editor with the following content.
# ***HaO 2012-09-30: add rule to allow clamav to access amavis files
# and writes back ok file and may create temp folder
module clamscanamavis 1.0;
require {
        type clamscan_t;
        type amavis_var_lib_t;
        class file {getattr read open write create unlink};
        class dir {search read getattr open write add_name create
setattr remove_name rmdir};
}
allow clamscan_t amavis_var_lib_t:file {getattr read open write create
unlink};
allow clamscan_t amavis_var_lib_t:dir {search read getattr open write
add_name create setattr remove_name rmdir};
To install this new rule, execute the following commands. They will use this .te (type enforcement) file and created a .mod (module) out of it. The next step will create a .pp (policy package) file that is installed with the last command. The .pp file is a binary representation and can not be converted/uncompiled back into the plain text .te version.
checkmodule -M -m -o se_clamav_amavis.mod se_clamav_amavis.te
semodule_package -o se_clamav_amavis.pp -m se_clamav_amavis.mod
semodule -i se_clamav_amavis.pp
Please be patient as the last command will take a while to finish. It is absolutely normal when you install a policy package to selinux that it takes some time to complete.
Read more of my posts on my blog at http://blog.tinned-software.net/.

